How to Install Portable Air Conditioner in Horizontal Sliding Window
A standard window air conditioner is one of the most common air cooling solution. The system lowers the temperature of your home and makes the space comfortable for both you and your family.
Why choose window air conditioners?
Summary
- Why choose window air conditioners?
- Installation of window air conditioners: need for professionals
- How much does professional installation cost?
- Window air conditioner installation by self
- Step 1: Location
- Step 2: Unit Selection
- Step 3: Build the support base
- Step 4: Attach the platform assembly:
- Step 4: Place the unit:
- Step 5: Create a tight seal
- Step 6: Power on
- Window air conditioner on a Wall?
- Tips for Apartment Dwellers
Source: lg.com
When compared to central air conditioners, window air conditioners:
- Are more cost effective, as they are priced at a lower rate than the central unit.
- Are suited for both permanent or temporary use and installation.
- Can be easily transported to desired locations.
On the downside, window air conditioners can cool only that area where it has been installed. Thus, you might have to look into other options or buy more units to cool the other areas of your home. These options can be both expensive and more energy consuming.
Installation of window air conditioners: need for professionals
It is wise to get trained professionals to install your system, as hiring them can help owners avoid:
- The hassle and physical exertion of installing the unit.
- Mishaps, damages to the unit and injuries to self during the installation process.
It also guarantees us accurate installation of the unit. Sometimes, when installing the unit, we might make mistakes like installing the insulation material incorrectly, take inaccurate measurements or forget to install all parts of the unit. These mistakes can significantly affect the energy efficiency of the unit and increase its operating costs. Also the additional costs incurred for rectifying these mistakes can be more than the initial cost of hiring the services of a professional in the first place.
How much does professional installation cost?
The cost of installing a window air conditioner professionally typically ranges from $150- $600, the cost for labor around $150- $250.
You can also compare the installation costs offered by different companies and contractors, and choose the best deal for installing the unit in your homes.
You should know, that most retailers who sell window air conditioner units, will have professionals to install the same for us. For instance, retailers like Lowe's, Home Depot and even Best Buys have professionals on stand-by to install these units to the customer who purchases them.
All you have to do is schedule a time and date for installation.
Window air conditioner installation by self
If you are planning to install your window air cooling system by self, here is a thoroughly researched step-by-step instruction guideline, specifically outlining the steps required for installing the unit into a casement slider window.
Step 1: Location
Your first step must be to identify an area for installing your unit. When doing so, bear in mind the following points:
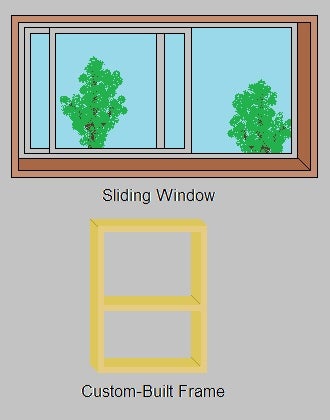
Window requirements: Generally, most units are designed for a double-hung window, which has a fixed upper pane and a movable lower pane. In order to install the unit safetly and properly in a casement window, you will need to make some modifications, such as a base (a table-like structure) to support the cooling system.
You must inspect and make sure that the window has sufficient space to place this support base, and be prepared with the tools and materials (wood, foam board, plywood and others) to build the base.

Different window types!
Accessible power outlet: Ensure that there is a power outlet close to the window as most units have an electrical cord which is only six feet long. The outlet must be able to accept a three-prong plug. It is not advisable to use extension cords for window air conditioners as they are at risk of being a fire hazard.
Circuit load : Check the power outlet and ensure that it has the capacity to support the AC unit. If the outlet cannot support the unit, make arrangements for installation of another circuit. This step is essential as it helps to prevent fuses, tripping of circuit board and occurance of power surges when the unit is in use.
Surrounding area: M ake sure that the unit is not obstructed by any furniture as it can hinder the circulation of cool air within the room. Similarly, the area outside must also be free from bushes, walls, trees and fences to allow for free release of heat from the unit. Place the unit in a shaded area as direct sunlight can decrease its efficiency.
Step 2: Unit Selection
This step, although not an actual part of the installation process, has been mentioned here to draw your attention to the relation between the unit and area where it will be installed.
That is, in order to select a unit, we need to know the measurements of the window (height and width) and the area (square footage) of the room. This helps us to determine and select the unit with the optimal capacity (maximum area cooled by the unit). Generally the capacity and the range of acceptable window sizes (for installation) is mentioned on the packaging of the unit.
When measuring the window, remember to open it fully outwards and using a measuring tape record its height and width. Measure it twice to avoid any mistakes.
Units are also selected based on its energy efficiency rating (EER) and British thermal units (BTU). These measurements give us a clear idea about the energy efficiency and cooling ability of the unit. For example, large rooms require units with higher BTU's and an EER of 10 or more.
Step 3: Build the support base
Before building the support base remove the screen, clean the window (windowsill, glass and frame), and mark the centre of the window. Using the window measurements, create a strong wooden support base for the unit. This wooden base is to be placed on the window sill and the metal platform (provided by the manufacturer), goes on top of the support base. The purpose of creating such a base is to provide additional space to support and balance the unit instead of relying on the window sill alone.
Here are the approximate measurements for the support base. Remember that this has to be made according to the size of your window and unit.
- Width: The width should be a few inches more that the width of the unit, including the window frame (usually 17 inches)
- Height: The height should be till the bottom track of the window, to avoid placing the weight on the track.

Support base Source: Instructables. com
Support base Source: Instructables.com
The base should be strong and stable enough to carry the weight of the unit. If the unit falls to the ground or deck, it can injure a person.To prevent this from happening, reinforce its stability by fixing it to the deck or ground, or through any other means.
Step 4: Attach the platform assembly:

Platform Assembly. Source: theairconditionerhomeguide.com
The platform assembly is attached onto the front edge of the support base, with its long ends extending out of the window. Screw the platform onto the center of the sill and the support base (on the mark, 8-11/16th inch from window jam) and secure it using support brackets. These brackets cost around $30- $100 and can be purchased online or from home improvement depots.
Step 4: Place the unit:
With the help of extra hands, lift the air conditioner and place it on the support. The support should carry most of the air conditioner's weight.
Using a spirit level ensure that there is a slight tilt ( about one-quarter inch down, from front to back). The slight angulation is needed to drain the captured moisture through the rear of the unit. For maximum efficiency, the ventilation of the unit should be outside the window.
Tilt of Window AC to faciliatate water draining. Source: lg.com
Step 5: Create a tight seal
Once the unit is in place, you will need to seal the open space above it. You can use wood or foam board or select a material that will not easily break and can fit perfectly in the window groove. It is important to seal all spaces and gaps so that the hot air does not enter back into the space.
Step 6: Power on
Finally plug in the unit, switch it on and run it for some time. You have now successfully installed your window air conditioner.
Installation without drilling
It is natural to wonder if the unit can be installed without drilling. This may be to preserve the aesthetics of the window or to avoid putting holes in the house.
But the truth is, it is safer and better to install the unit by securing with screws as it reduces the possibility of the unit falling off the window.
Installing without side panels
Side panels are also used to reinforce the stability of the unit and to secure them in the window. Some units will have accordion style panels included in the installation kit. These are generally used for securing units in double hung windows.
You can install the unit without side panels (depending on window type), but you still have to use a filler material to safetly secure the sides of the unit and to close up all gaps around the window. This helps to prevent air from entering the room.
Window air conditioner on a Wall?
Generally window air conditioners release the hot air through its sides and back. For this reason, most of these units cannot be installed on a wall, as the wall might block its vents on the sides, leading to overheating and damage to the unit.Only window air conditioner models with a wall chasis sleeve that slides out, can be installed through walls.
If your room has no windows, you could consider installing a Through-The-Wall air conditioner unit, specifically designed for installation through walls.
These units are specifically built into the wall and vent the hot air throught it's back. However you should be aware that this is a permanent installation, as it creates a hole in your wall.
Tips for Apartment Dwellers
For those of you residing in apartments and wishing to install a window air conditioner, the first step is to ensure that you have the necessary permission to do so. Consult with your building management or housing board authorities, as some apartments may prohibit the installation of window air conditioner units due to safety and aesthetic reasons.
If you are permitted to install the unit, the steps are the same as above. However, it is wise to seek professional services if your apartment is on higher levels and does not have a deck to support the support base. In such cases you might have to drill flanges and use L shaped brackets along with the platform assembly to provide adequate support to your unit.
Although not specifically designed for such windows, window air conditioners can still be installed in casement slider windows. As long as you are prepared (with tools, materials and additional help), careful and attentive to details and instructions you will be able to install your unit correctly and efficiently.
Welcome to The Air Geeks!
We help you choose the right air product for your home. Happy browsing!
How to Install Portable Air Conditioner in Horizontal Sliding Window
Source: http://www.theairgeeks.com/install-standard-window-air-conditioner-casement-slider-window/